


Try Default

See how revenue teams automate revenue operations with Default.

Key Takeaways
Once you qualify a Lead in Salesforce, you need to convert it into a Contact, Account, or Opportunity. Otherwise, you won’t be able to track its progress through the sales pipeline. Unfortunately, however, sometimes data can be lost during the conversion process. That’s where Salesforce lead conversion mapping comes in.
Sometimes this data loss is perceived, not real. Data appears to be lost because the user doesn’t have permissions to view certain fields in the converted object. Other times, data fails to map onto the appropriate field and is either lost or mislabeled.
In this article, we’ll walk through the process of Salesforce lead conversion mapping and how it can help avoid unnecessary data loss. We’ll also cover some best practices to ensure a seamless conversion process.
Key Takeaways
- Why it’s important to set up Salesforce lead conversion mapping before you start converting leads
- A brief summary of the Salesforce lead conversion process
- Common causes of data loss during the lead conversion process
- What to do if you lose data upon converting a lead in Salesforce
The benefits & importance of Salesforce lead conversion mapping
Mapping lead conversion data in Salesforce reduces data loss and corruption, but that’s not the only benefit of this practice. By reducing time spent on lead management, you can devote more resources to building automations, supporting your revenue teams, and bringing in revenue.
Mitigate data loss
When you convert a Lead into a Contact, Account, or Opportunity, any data not mapped to those new object types isn’t technically lost. However, because the Lead becomes a read-only record, you can’t update that data after conversion.
If you’ve failed to map custom fields to new object types before conversion, you’ll be unable to change or update that data. Instead, you’ll need to create and repopulate new fields in the new object. This, of course, can be a time-consuming process, especially if you have a sizable database.
Save on Salesforce management resources
Every minute your Salesforce admin is spending troubleshooting lost data from converted Leads is time away from other mission critical tasks. By mapping Lead data, you can significantly reduce the amount of time your team spends on these tasks and reallocate those resources accordingly.
Accelerate lead scoring, qualification, and follow-up
Automated lead conversions can be problematic when you’re constantly dealing with issues on the other side. If you’re constantly having to figure out why a Contact’s data vanished, you’re holding up your reps from reaching out to them.
Since fast responses lead to higher booking rates, lead conversion mapping can not only accelerate lead qualification and speed-to-lead, but ultimately improve your close rates.
Improve sales effectiveness
Personalized outreach can improve B2B conversion rates by 10% or more. So after a lead converts, you want to make sure your reps have all the information they need to provide a tailored, personalized sales experience. The more data that carries over from conversion, the more personal details your salespeople will have.
How to use Salesforce lead conversion mapping
When you convert Leads in Salesforce, standard fields automatically map to the corresponding fields in the Contact, Account, or Opportunity. This functionality is fairly straightforward and rarely results in problems. The challenge arises when mapping custom fields.
If you create a custom field for a Lead without mapping it to a Contact, Account, or Opportunity field, the data will have nowhere to go. So it won’t carry over to the new record.
As such, standard operating procedure should be that any Salesforce admin who creates a custom field should immediately map that field to an analog in a Contact, Account, or Opportunity.
Thankfully, Salesforce lead conversion mapping follows a straightforward process:
- Navigate to the Setup menu in the top right-hand corner of your Salesforce UI.
- In the Quick Find bar, type in “object manager,” then select Object Manager.
- From there, select the Lead object. You’ll be redirected to a window that looks something like the following:
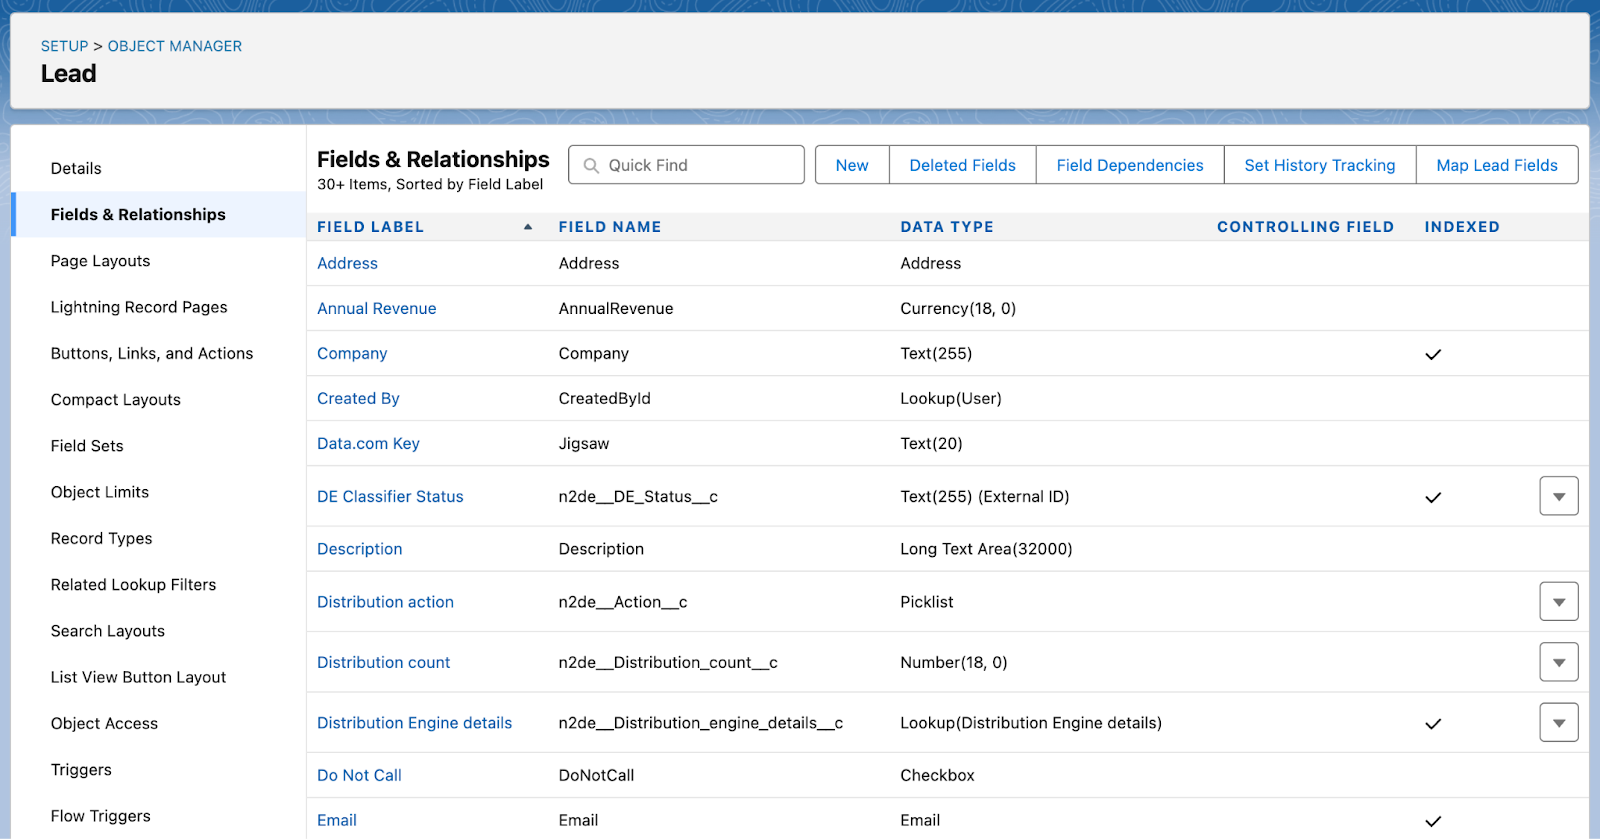
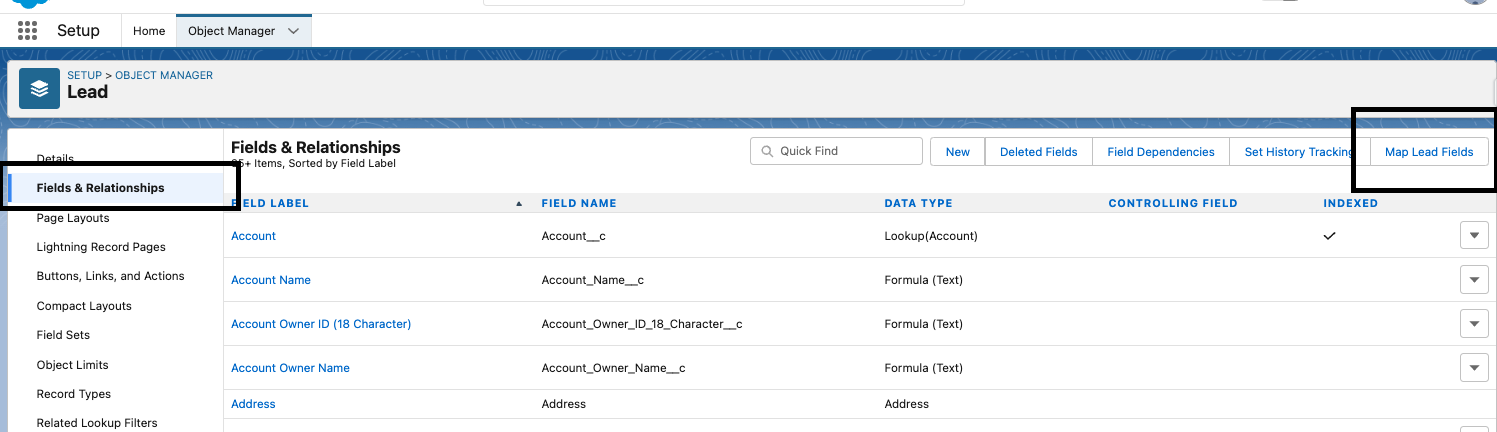
- On the right-hand menu bar, select Fields and Relationships.
- In the top right-hand corner of the window, select Map Fields.
- From there, you’ll be directed to a screen where you can toggle between Account, Contact, and Opportunity tabs. On the left-hand side, you’ll see your custom lead fields. On the right, you’ll have the option of designating the Account, Contact, or Opportunity field where those data should be sent.
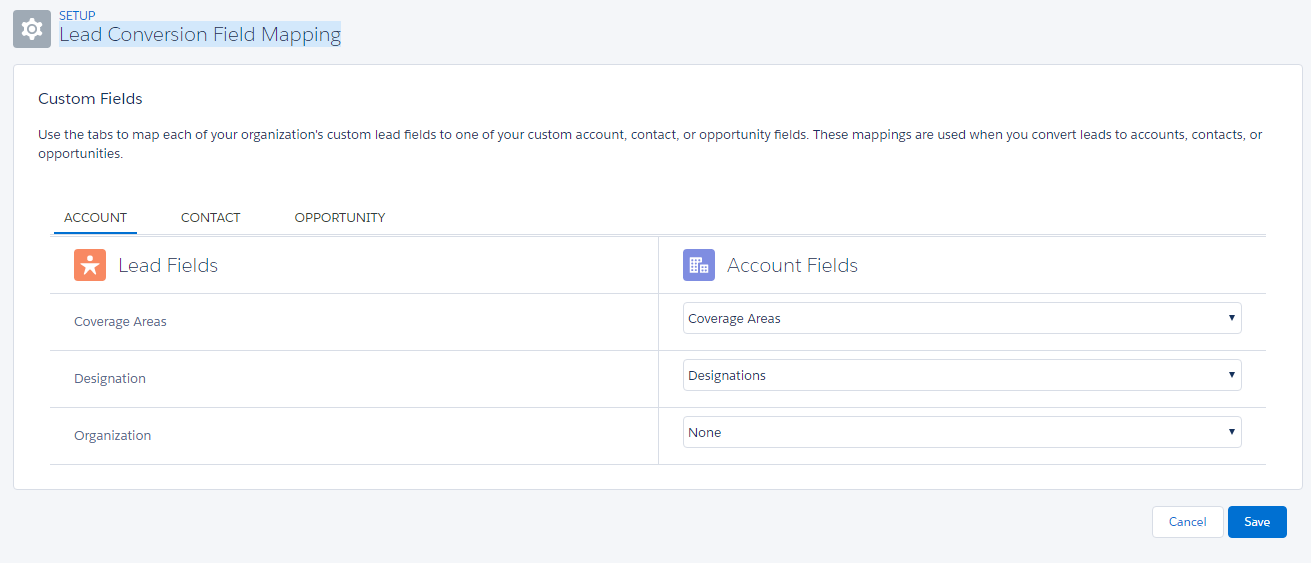
- Once you’ve mapped all your custom fields, scroll to the bottom of the page and select Save.
In the past, Salesforce users have been able to use the Process Builder to map custom fields for lead conversion. However, as of last year, users cannot create new Processes, making this functionality essentially obsolete.
Converting a Salesforce Lead into a Contact: Step By Step Guide
There are two ways to convert a Salesforce lead into a contact. You can either use either Lightning Experience or Salesforce Classic. Either way, the conversion process is the same:
- Salesforce will automatically create a new Account for a converted Lead unless you connect that Lead with an existing Account
- Lead conversion is permanent and cannot be reversed
- Only users with View and Edit Converted Leads permissions enabled will be able to see those objects post-conversion—otherwise, the objects will seem to “disappear”
You can also associate (Classic) or merge (Lightning) a newly converted Lead with an existing Contact. However, the Contact in question must exist prior to the conversion.
Salesforce Lead conversion process (Salesforce Classic)
If you’re using Salesforce Classic, here’s how to convert a Lead into a Contact.
- Select the Lead tab
- Open the Lead record
- Select “Convert”
- In the Account, Contact, and Opportunity fields, Name field, either select Create New or Attach to Existing
- Complete all other required fields
- Select “Convert”
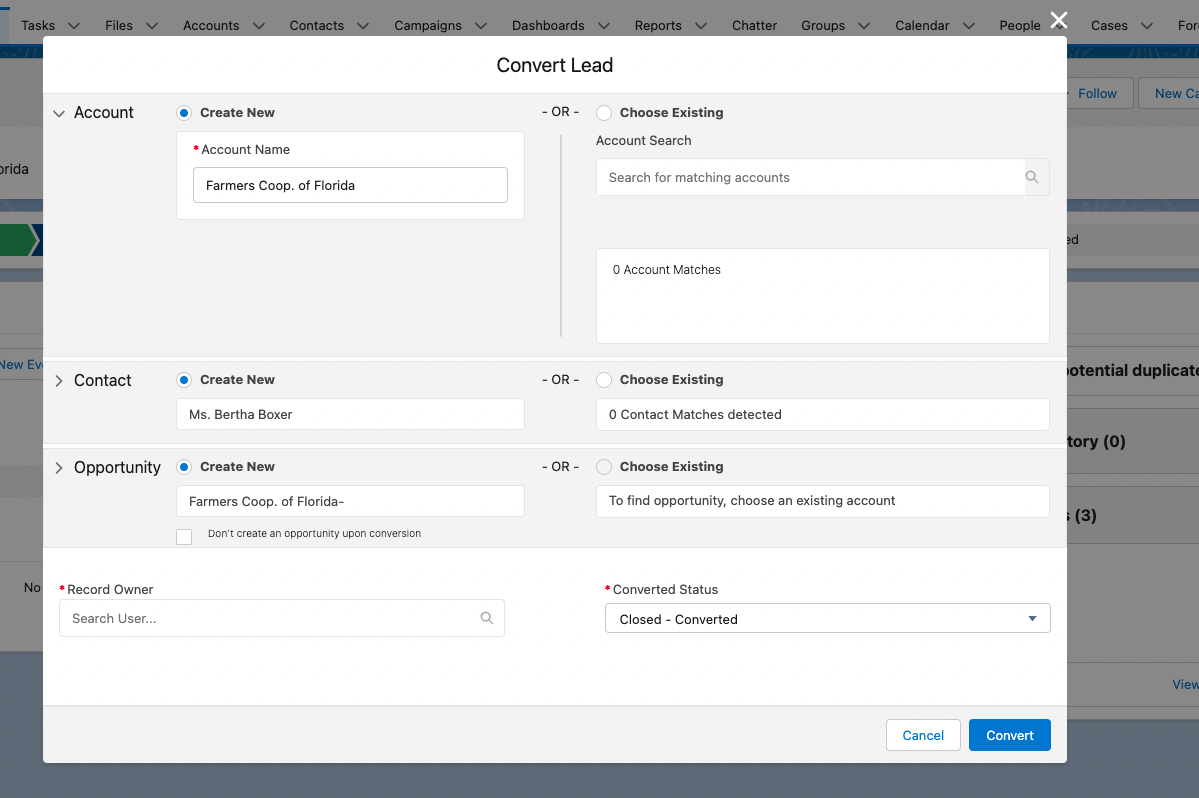
Salesforce Lead conversion process (Lightning Experience)
Now, here’s how the lead conversion process works in Lightning Experience:
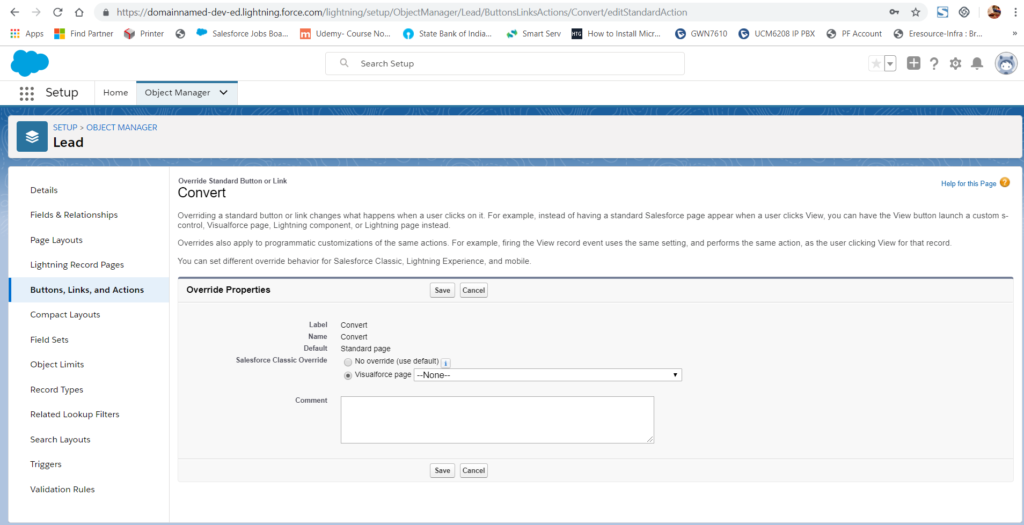
- Navigate to the Lead record
- Select “Convert”
- Choose to either create new Contact or convert to existing if a duplicate exists (Optional: update the Lead Source for the existing Contact)
- Attach either to a new Account or Opportunity or existing
- Choose a record owner
- Choose the converted status
- Select “Convert”
Why is some data missing when converting a Lead to a Contact in Salesforce?
There could be any number of reasons for missing data after lead conversion in Salesforce. Here are some of possibilities to consider when troubleshooting.
No custom field mapping
The first and most obvious reason is that you haven’t mapped custom Lead fields to corresponding fields in Contact, Opportunity, or Account records. Without mapping these fields, Salesforce doesn’t know where to put the data, which means it won’t carry over to the new record.
Lack of user permissions
Depending on your Salesforce governance policies, certain fields and even entire converted objects may be restricted in terms of which users can view them. If you have permission to view Leads, but not converted Leads, it could seem like the contact record has disappeared.
Validation rules
Salesforce allows you to set up validation rules for various objects and their data. If the Lead data doesn’t meet one of the validation criteria for the new Contact, Account, or Opportunity, Salesforce may block the conversion. If the conversion goes through, the data could be lost or altered.

Compact layout rules
If you’re using Salesforce on a mobile device, tablet, or shrinking your window to a particular part of your screen, your compact layout rules may not display the appropriate fields. Try adjusting your window size to see if the data reappears.
What to do if you lose data during Salesforce lead conversion
Even the most detail-oriented, conscientious Salesforce users make mistakes. If you think you’ve lost data during a Salesforce conversion, here’s a step-by-step guide to fixing the problem:
- Check mapping settings. First, check your lead conversion mapping settings. Make sure that you’re looking for your lost data in the right place in the new object. If you don’t have access to these settings, contact your Salesforce admin.
- Document the incident. If your mapping settings are correct and the data still is not transferring over, document the incident. If it happens repeatedly, you should bring this to your Salesforce admin so they can investigate the issue.
- Check the recycle bin. Check the recycle bin for missing data. Data will remain in the Salesforce recycle bin for 15 days before being permanently deleted.
- Manually restore data. Manually enter the retrieved data from the recycle bin to the new record. This can be a helpful stop-gap in the event of a one-off problem, but isn’t a long-term solution.
- Evaluate & improve lead conversion processes. Ultimately, if you have repeated problems with your lead conversion processes, you should find out what’s wrong and work to address those concerns.
Other solutions to Salesforce lead conversion mapping
If you’re not comfortable with Salesforce’s lead conversion mapping as a way to hold onto your lost data, there are more secure alternatives out there. Many of these are helpful in overcoming some of the bigger challenges with Salesforce lead conversion overall:
- More flexible lead qualification, scoring, and conversion
- Use of enrichment data before, during, and after conversion
- Built-in tech stack orchestration to integrate Salesforce CRM with your lead distribution, calendaring, marketing automation, and sales intelligence software (and more)
- One central location for your contact data, which practically eliminates the risk of losing data through Salesforce conversion
1. Default

If you’re looking for a platform that fills the gaps left by Salesforce’s lead conversion capabilities, Default is your best option. Our platform offers more flexible and easy-to-build workflows, and seamlessly integrates all your RevOps tools in one place.
Additionally, Default functions as an orchestration layer for your entire tech stack, including Salesforce. It serves as a single source of truth for all your lead, prospect, and customer data. With Default, you never have to worry about data loss during lead conversion.
Not only does the platform ensure all your data makes it through the conversion process, but it also brings in third-party enrichment data to aid in both lead qualification and personalized outreach. Plus, our platform automates all necessary post-conversion activities: lead routing, calendaring, ongoing nurture, and more.
And most importantly: Default is straightforward, easy-to-use, and ready to go within minutes. No need for expensive implementation and configuration.
2. Salespanel
Salespanel helps RevOps teams track, qualify, and analyze their leads. By storing and processing data throughout the entire customer journey, this tool can serve as an excellent supplement to Salesforce’s lead conversion functionality. If you end up losing data, Salespanel can easily replace it.
Other core features include real-time lead tracking, multi-demographic lead qualification and predictive lead scoring, and AI-powered revenue intelligence.
3. eSpatial
While Salespanel is built for the marketing and sales use case specifically, eSpatial has a broader appeal. This mapping software platform helps users visualize, analyze, and share all kinds of business data.
The biggest challenge with eSpatial is that it handles a variety of use cases, and thus requires some advanced configuration upon setup if you’re going to get value out of it. On the other hand, it has a built-in Salesforce integration.
4. Cloudingo
Cloudingo is built to help you maintain clean data across your entire Salesforce CRM. With automated merging, batch data updates, validation, and sync and integration features, Cloudingo provides more sophisticated data management than what Salesforce native offers.
The biggest drawback to Cloudingo is that it has a complex user interface, has a steep learning curve, and requires extensive configuration to set up.
Final thoughts on Salesforce lead conversion mapping
Salesforce lead conversion mapping is an essential part of the overall lead conversion and sales workflow process in the CRM. If you don’t map custom fields, you risk losing data as prospects progress through the funnel.
Default can help you avoid this problem by orchestrating lead data outside of Salesforce. You never have to run the risk of data loss as your RevOps automations scale up. Learn more about how Default integrates with Salesforce below.
Conclusion
Former pro Olympic athlete turned growth marketer! Previously worked at Chili Piper and co-founded my own company before joining Default two years ago.
Accelerate your growth with Default.
Revamp inbound with easier routing, actionable intent, and faster scheduling


%201.svg)


.svg)


%201.svg)


%201.svg)
