Try Default

See how revenue teams automate revenue operations with Default.

Key Takeaways
Round robin is a popular approach to lead distribution. It’s fair, balanced, and easy to automate without much hassle. That is, unless you use Salesforce. Round robin lead assignment in Salesforce, unfortunately, can be more complex.
Setting up round robin in Salesforce is far from straightforward. There are multiple approaches, each with their own pros and cons. Often, you need advanced Salesforce expertise to get them to work.
But automating lead assignment in your RevOps tech stack is critical if you want to scale your inbound lead volume and customer base. So here are some tips and tools for making round robin lead assignment in Salesforce as quick and painless as possible.
Key takeaways
- The advantages and disadvantages of setting up round robin lead routing in Salesforce
- How to set up the custom fields necessary to do round robin rules in Salesforce
- Five different approaches to automating round robin rules in Salesforce
- Types of software and digital tools to help automate round robin in Salesforce
What is round robin lead assignment in Salesforce?
To explain round robin lead assignment in Salesforce, let’s use a quick analogy: dealing cards. Just as the dealer deals a card to each player before cycling back, round robin rules assign one lead to each sales rep before cycling back.
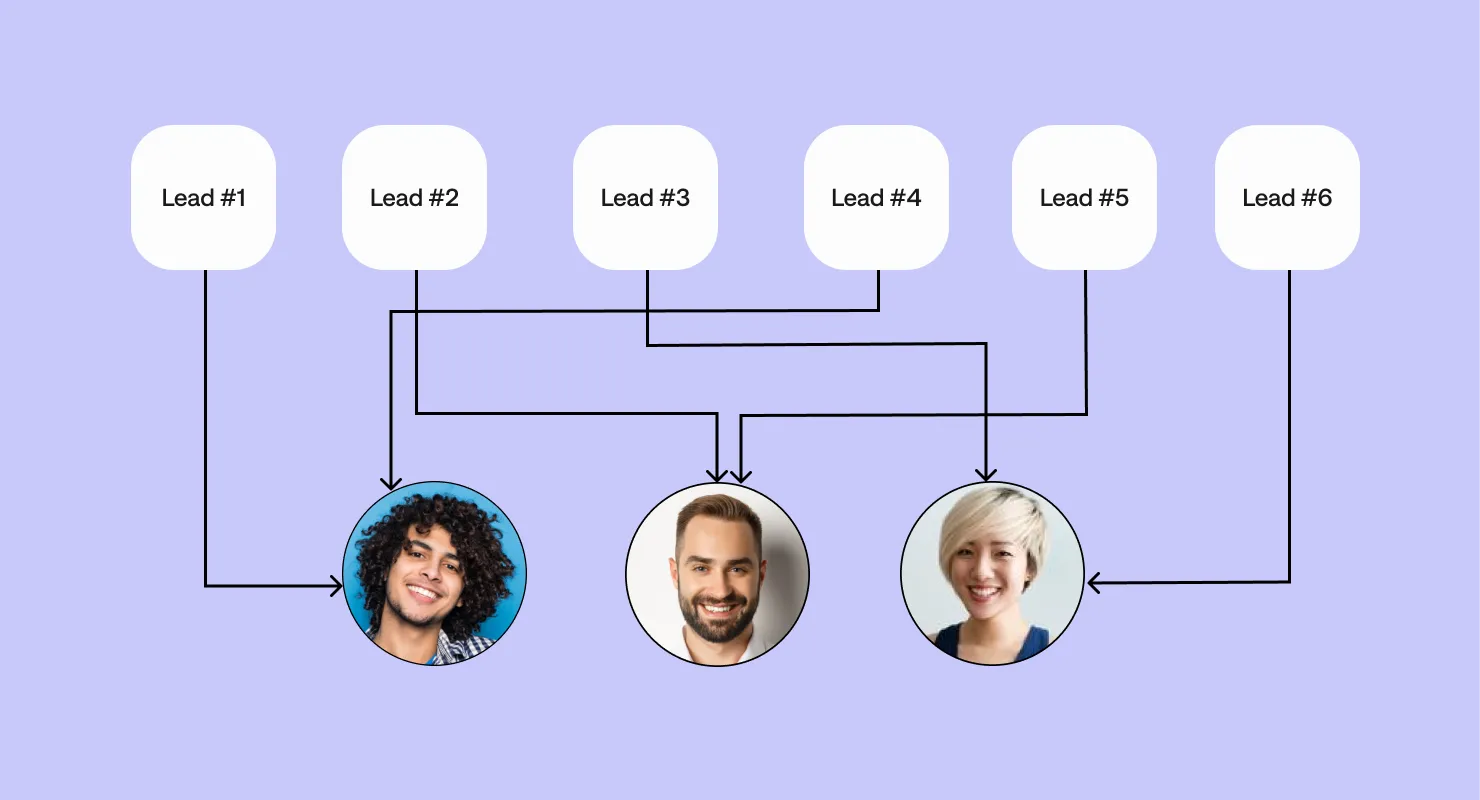
Let’s consider a relatively straightforward scenario: you have three sales reps and six leads come in. Under round robin rules, you’d assign the leads according to the following pattern:
- Lead #1 goes to Rep #1
- Lead #2 goes to Rep #2
- Lead #3 goes to Rep #3
- Lead #4 goes to Rep #1
- Lead #5 goes to Rep #2
- Lead #6 goes to Rep #3
The following graphic illustrates how this works:
Round robin meetings are popular among sales reps and leaders for one main reason: it’s fair, balanced, and unbiased. Accusations of favoritism don’t really stick when leads are distributed evenly (especially when Salesforce handles it automatically).
But there are some weaknesses to this approach. The biggest one is that leads are assigned to reps with no consideration of whether the next available rep is the best person to close the deal.
For example, a major Fintech company could convert into an inbound qualified lead. However, the next available sales rep may have experience in IT broadly, but not Fintech specifically. Another rep on your team may have 10+ years’ experience in Fintech. If you want the best chance at closing that deal, you’ll want the Fintech-savvy rep to respond to the lead, even though they may not be “next up.”
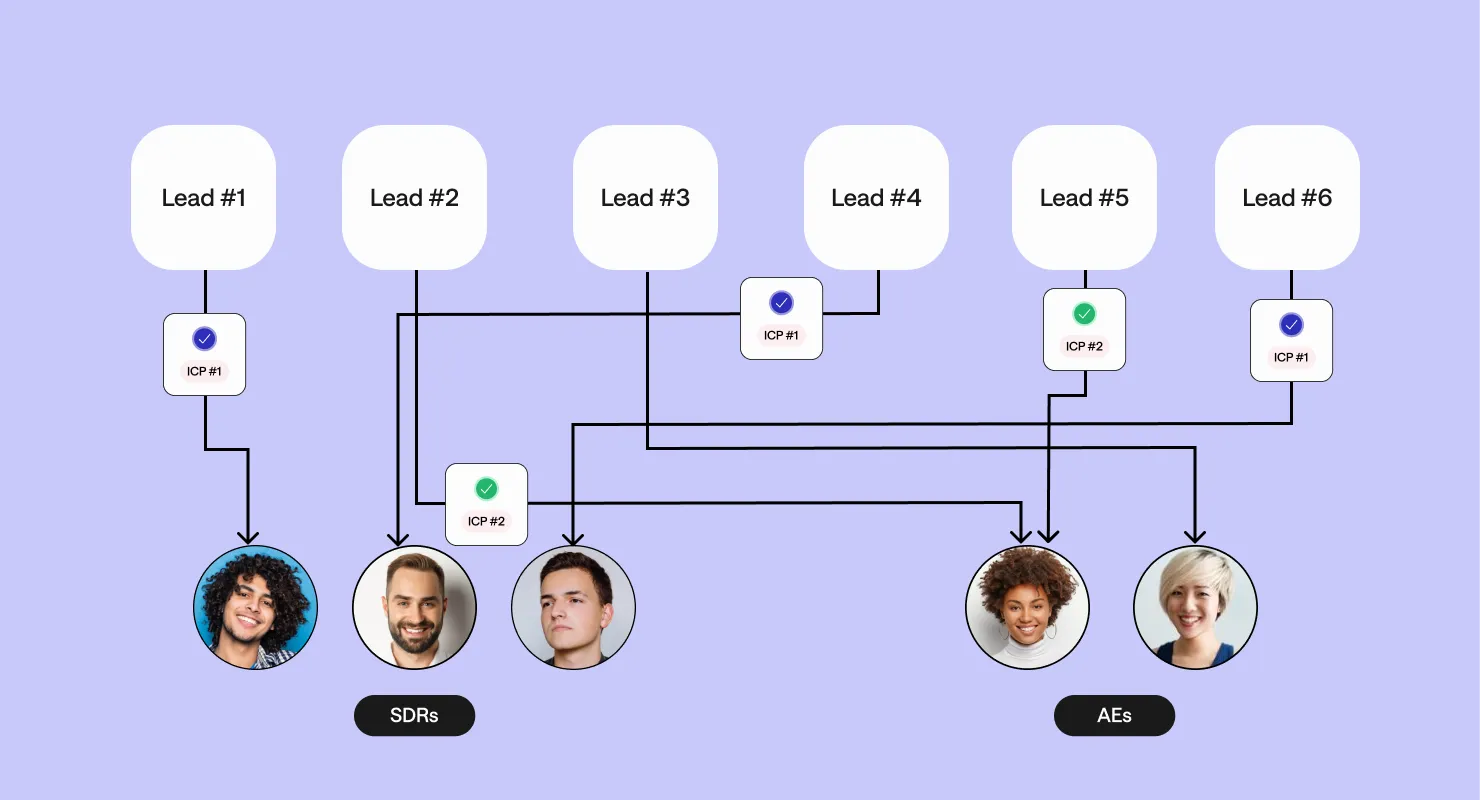
That’s why many sales leaders develop what’s often called “custom round robin,” where certain lead attributes (e.g. demographics, intent data, lead score) either “bump” the appropriate rep to the top of the queue, or limit the available reps to those meeting certain criteria. In our example, either your resident Fintech expert gets “bumped” to the top of the queue or your system only considers reps with Fintech experience as “available” when assigning the lead.
Here’s a simple example, where a system routes a lower-value ICP #1 to SDRs and a higher-value ICP #2 to AEs:
When considering how to set up round robin lead assignment in Salesforce, we need to ensure we configure the platform—and other orchestrated RevOps software—for both use cases: simple & customized round robin rules.
How to do round robin lead assignment in Salesforce: 5 methods
So how do you set up round robin lead assignment in Salesforce? It requires a combination of custom fields and automations. The former you’ll set up directly within the Salesforce CRM, while the latter can take a number of configurations.
Let’s start with the custom fields you need. The first is a Lead Number f+Field, which gives each lead a unique ID. To create this field in the Classic console:
- Open Setup.
- Search for Object Manager. Open it.
- Select Lead.
- Select Fields & Relationships.
- Create New.
- Select Autonumber, then Next.
- Name this new field Lead Number.
- Enter {0} into Display Format.
- Enter 1 into Starting Format.
- Check Set this field as the unique record identifier from an external system.
- Grant user permission to the right people to view this field.
- Select Save.
After you’ve assigned a unique ID to each new lead, you can then create a new Round Robin field. This field, once properly configured, will tell Salesforce to assign new leads to the next user in the queue in the right order:
- Select Formula, then Next.
- Give the field a Name. In this case, let’s go with “Round Robin.”
- Select Number. Choose 0 Decimal Places.
- Select Advanced Formula.
- In the Test (Number) =field, paste the following formula: MOD(VALUE({!Lead_Number__c}),4)+1
- Select Next.
- Ensure all users have appropriate access, then Save.
Here’s how that formula works: Lead_Number will pull in the field from above, and you’ll want to replace “4” with the number of reps in your organization that are available for round robin.
Once you build these custom fields, you’re all set to build out your round robin automations. There are a number of ways to do this, and each has their own pros and cons. Let’s take a look at five of the most popular options.
Flow Builder
Salesforce includes a built-in automation feature called Flow Builder. This no-code tool enables you to create automations, forms, and guided experiences, whether simple or complex, then use them throughout the Salesforce platform.
Flows in Salesforce use a combination of elements, connectors, and resources:
- Elements are actions that a flow can execute
- Connectors are the paths that a flow is able to take
- Resources are the values you can reference throughout the flow
The template for a particular Flow can be triggered automatically or manually. For a full list of the available Flow types, read this article.
Here’s the process for setting up a new Flow in the Flow Builder:
- Open Flow Builder.
- Select Setup > Quick Find > Flows > New Flow.
- Select Start from Scratch.
- Define your Flow Type, then Create.
- Use the built-in canvas to add Flow elements. Connect the elements to determine their order of execution.
- Select Save to keep your new Flow.
For round robin rules, you’ll want to add a Lead Assignment element to the Flow, then specify the Round Robin field created above as a Resource to help determine where the lead is assigned.
Further customization will require far more advanced formula-building and workflow automations than we’re able to reference in this article. Additionally, you may find that you need expert-level Salesforce expertise for workflows this complicated.
Advantages
- Flow formulas. For scenarios involving complex logic, Flow formulas can perform calculations, manipulate data, and help you make decisions based on field or variable values. These facilitate conditional logic, which are essential for setting up round-robin workflows.
- Edit and adjust flows. If you decide to customize your round robin rules at a later date, you can always change flow direction, add elements, and further adjust your processes quickly and easily.
- Handles complex use cases. Theoretically, there’s no limit as to how far you can customize Flow, so you can build out automations to handle your more complex use cases.
Drawbacks
- Limited customization. For more advanced flows and tasks, it can be difficult to build a flow perfectly tailored to the task—especially if your Salesforce expertise is anything less than expert.
- Performance challenges. Some users have noted that Flow runs into issues executing large datasets.
- Learning curve. Like many Salesforce features, Flow has a steep learning curve that those unfamiliar with the broader ecosystem may have a hard time onboarding and implementing.
- Usage-based entitlements. Salesforce provisions set amounts of Flow usage in your contract. If you exceed these limits, you’ll need to discuss a contract increase with Salesforce.
- Plan-based limits. Each Salesforce plan comes with unique limits on the number of flows, flow types, versions, executed elements, flow interviews, and other elements per pay period.
- Per-transaction limits. To ensure high-usage flows don’t take over shared resources in multi-tenant environments, Salesforce enables limits on each transaction, rolling back executed Flows that exceed those limits.
Apex
For even more technical users than those using the Flow Builder, you can create even more complex and customized workflows through Apex. Apex is an object-oriented programming language that leverages both control statements and API calls to execute commands.
Apex’s unique syntax enables a merging of business logic with system events. What’s more, commands can be initiated by both Web service requests, and triggers on objects.
Getting into how to set up a round robin lead assignment workflow in Apex is really only applicable for developers. Here’s a blog post that provides all the technical detail you’ll need to make it happen.
Advantages
- High degree of customization through the use of custom code
- High degree of developer control, which enables you to account for a range of use cases and virtually limitless nuances in customer journeys, verticals, etc.
- Apex commands are excellent at handling very large data quantities and, thus, are incredibly scalable
Disadvantages
- Apex requires coding expertise, knowledge of programming languages, and intense familiarity with Salesforce architecture to operate
- As with any custom development project, building round robin lead assignments in Salesforce is slow and painstaking
- Apex code is complex, requiring extensive time and effort to maintain and troubleshoot when issues inevitably arise
Lead Assignment Rules (LARs)
Lead assignment rules are processes within Salesforce that automatically assign leads to users or queues based on specific rules or criteria. These rules can be demographics-based, territory-based, or, more relevant to this specific article, round robin rules.
Let’s walk through how to create a LAR that distributes leads evenly across all of your sales reps:
- Go to Setup. Choose Lead Assignment Rules.
- Select New.
- Assign a name to your new LAR, then Save.
- Open your new LAR.
- Under Rule Entries, select New.
- Under Sort Order, enter 1.
- Choose Round Robin (that custom field described in the beginning of this section) in the Field dropdown menu, Equals in the Operator dropdown, and 1 in the Value field.
- You can either select the user this rule applies to, or select an email template to automatically tell the user a rule has been assigned to them.
- You should repeat these steps for every user in your round robin rotation, using 2, 3, 4, etc. for each successive rep.
Advantages
- LARs are easy to set up and maintain—very little custom work (aside from the formula used to build the custom Round Robin field) is required
- LARs are a built-in, native functionality in Salesforce, which means they come with fewer risks than a custom development solution
- You can use LARs for a variety of use cases, including territory- and source-based routing rules
Drawbacks
- LARs are fairly difficult to customize, as you can probably tell from the instructions above
- Standard, basic round robin is the only function supported through lead assignment rules
- You can only have one active LAR at a time—e.g. you can’t limit round robin assignments to reps within a specific territory
Process Builder
Long-time Salesforce users are no doubt familiar with the Process Builder, the platform’s legacy automation functionality. Process Builder supported three types of automations: record change processes, event process, and invocable process. All three types consisted of criteria that determined when to execute the action, and whether the action was immediate or scheduled.
The only drawback worth mentioning is that the Process Builder was sunset in 2023, meaning you can’t create new automations through this method. Salesforce is encouraging all Processes to migrate over to Flows.
Default
All the built-in Salesforce solutions we’ve discussed so far come with a significant tradeoff. You can either have a simple, straightforward, no-code solution that a beginner or intermediate Salesforce user can handle. Or you can have a high degree of customization, flexibility, and control.
We don’t believe you should have to choose between the two. So with Default, you truly can have the best of both worlds.
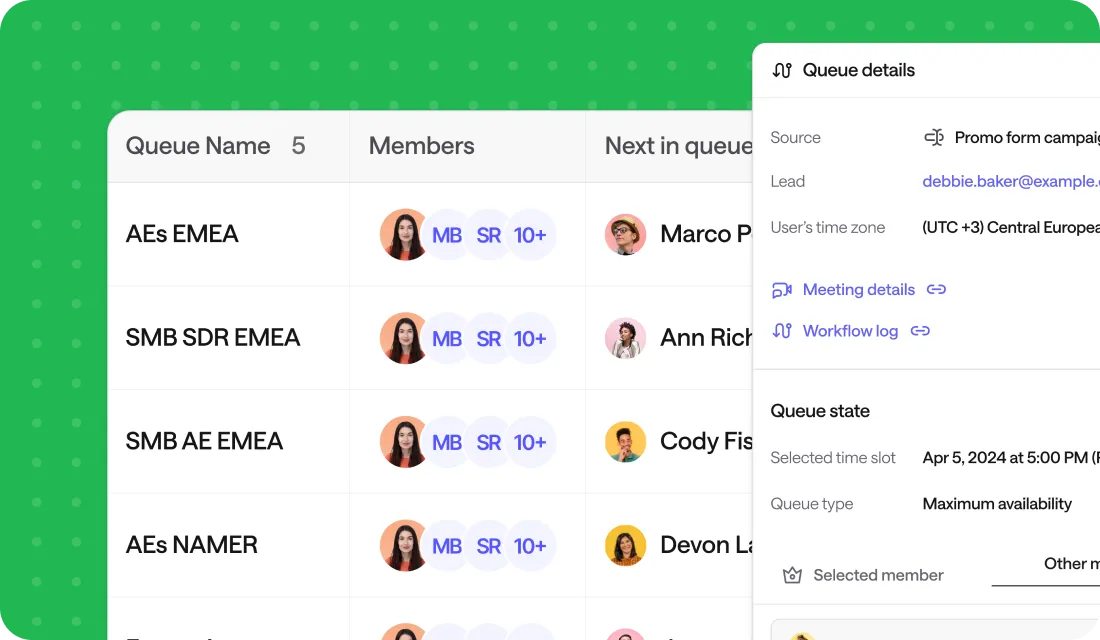
Default takes the lead assignment and routing process out of Salesforce and orchestrates not only Salesforce automations, but all automations across your sales workflow tech stack.
Because we’re not limited to Salesforce’s built-in functionality, Default offers even more capabilities:
- Form automations that not only capture leads, but automatically enrich contact records with high-quality data
- Built-in lead-to-account matching through Salesforce APIs and webhooks
- Automated lead scoring and qualification flows to help match high-priority leads with the right sales reps
- Built in lead routing and scheduling at the point of conversion
- Ongoing automated nurture workflows to complement reps’ manual outreach
Once leads have been qualified, converted, and routed to the appropriate rep, our webhooks and APIs will make the appropriate changes in your Salesforce records.
To learn more about how Default can orchestrate round robin assignments in Salesforce—including custom and flexible routing rules—click here..
Advantages
- No-code workflows that enable multiple distribution logics (e.g. round robin + territory-based routing)
- All-in-one automation and orchestration capabilities that cover the entire lead assignment process—not just distribution
- A single source of truth not only for Salesforce workflows, but connecting Salesforce with other tools and platforms (e.g. sales management platforms)
- Built to not just distribute leads, but automate instant action and increase the likelihood of a booked meeting and closed-won deal
Drawbacks
- Operates outside of Salesforce and requires third-party integration
- Not built for developers—doesn’t have the degree of technical complexity that comes with writing custom Apex code
- Built to be an all-in-one replacement for your RevOps tech stack—not meant as a point solution
Software and tool types that can do round robin lead assignment
If you’re interested in setting up round robin lead assignment rules, there are multiple software categories that provide that functionality:
- CRMs. Salesforce and HubSpot are the two leaders in the CRM space, and both have built-in round robin lead automation (HubSpot’s is much easier to set up).
- Sales engagement software. The two leading sales engagement software platforms—Salesloft and Outreach—all come with lead assignment functionality, and can easily be configured with round robin rules.
- Lead routing software. Although it may seem obvious, it’s worth pointing out that lead routing software—like Default, Chili Piper, LeanData—all have round robin routing capabilities.
- Sales scheduling software. Nearly every scheduling solution on the market includes some kind of lead assignment functionality, to varying degrees of complexity. Default, Calendly, and Chili Piper are all examples of this.
- Marketing & sales automation software. All the leading marketing and sales automation solutions—Default, HubSpot, Marketo, Outreach, Apollo.io—include built-in assignment processes that either natively or can be configured to deploy round robin routing rules.
- RevOps software. RevOps solutions that manage the whole customer journey—from initial conversion to closed-won and beyond—all have built-in processes for capturing and converting new leads.
Keep in mind that if you’re building a tech stack primarily from point solutions, many of those solutions will have redundant lead distribution capabilities. As such, it’s important to ensure that you don’t have duplicate routing functionality running across your stack—otherwise, you could end up sending conflicting information to your Salesforce CRM and causing a tangled mess!
Or, you could avoid that problem entirely by using an all-in-one automation solution for lead capture, qualification, routing, scheduling, and ongoing nurture.
Round robin lead assignment in Salesforce FAQs
How do I assign a round robin lead in Salesforce?
There are several ways to assign a round robin lead in Salesforce. You can create a custom workflow via Flow Builder, create a new Lead Assignment Rule, build a custom command via Apex, or use a third-party orchestration solution.
What triggers a lead assignment rule in Salesforce?
Lead Assignment Rules trigger at the creation of a new lead. For post-creation lead assignment, you’ll have to set up a new Flow, create custom Apex code, or use a third-party orchestration solution.
What are the limits of lead assignment rules in Salesforce?
Lead assignment rules have several limitations. You can only trigger them by creating a new lead, you can only have one LAR running at a time, and you can only create round robin rules through custom formulas.
Salesforce round robin lead assignment: final thoughts
Setting up round robin lead assignment in Salesforce is hard. You’ve got a few workarounds at your disposal, but they leave you with an overly simplistic model that doesn’t leave much room for flexibility.
So if you’re not interested in spending a bunch of resources on custom code, your best bet is to use a solution like Default that makes lead assignment easy and is 100% Salesforce-compatible.
Conclusion

Former pro Olympic athlete turned growth marketer! Previously worked at Chili Piper and co-founded my own company before joining Default two years ago.
Accelerate your growth with Default.
Revamp inbound with easier routing, actionable intent, and faster scheduling




.png)
