


Try Default

See how revenue teams automate revenue operations with Default.

Key Takeaways
HubSpot lead management can be a challenge. Sure, the platform is packed with features for capturing, nurturing, and converting leads. But it can be overwhelming even to know where to start, regardless of how familiar (or not) you are with the tool.
So if you’re looking for tips, guidance, and strategies to maximize your inbound sales and marketing efforts, you’re in the right place. This step-by-step guide will show you how to leverage the platform to convert more leads into loyal customers.
What is lead management in HubSpot?
While lead generation is key to revenue growth, those leads won't convert into revenue if you don’t proactively manage them. HubSpot offers a suite of scalable lead management features, including:
- Centralized CRM database for marketing, sales, and service teams
- Lead capture tools (i.e. forms and chatflows)
- Manual and predictive lead scoring
- Segmentation, list-building, and workflow automation tools
- Reporting and analytics tools and dashboards
- Integration with other RevOps and automation tools, including third-party lead qualification software and lead distribution software
What’s more, HubSpot has a user-friendly, intuitive interface that makes it easy to set up straightforward workflows and processes. However, if you want to take HubSpot lead management to the next level with non-linear, hyper-targeted marketing and sales automations, the platform becomes difficult to operate.
Before you set up lead management in HubSpot: key considerations
Nearly half of all lead management implementations fail. The most common reason for this is lack of clear goals and objectives. In other words, revenue teams will implement new systems before answering the question: why are we implementing this in the first place?
So before you jump head-first into HubSpot lead management, it's important to take a step back and get some clarity on the following areas.
Ideal customer profile (ICP)
A well-defined ICP is essential for attracting, converting, and, yes, managing leads. Your ICP will determine a number of lead management decisions, including lead scoring criteria, lead distribution and routing, personalized nurture workflows, and more.
Marketing-sales alignment
Lead management doesn't squarely rest on Marketing or Sales. In reality, it's a collaborative effort between both teams. If marketing manages leads poorly, they won't enter the sales pipeline. If sales mismanages leads, they won't convert into revenue.
Marketing-sales alignment, then, is critical to effective lead management. And for all its integrated features and hubs, HubSpot isn't a silver bullet that magically helps everyone work together smoothly. That's why it's important to establish lead qualification checklists, expectations on each team's obligation to the other, boundaries, handoff processes and lead distribution rules, and ownership rules.
Lead scoring & qualification
HubSpot offers two types of lead scoring tools: manual and predictive. It's important to decide which one you're going to use, or if you're going to use a combination of the two. In the latter case, you need to clearly define how each scoring model fits into your inbound lead qualification process. Otherwise, you risk contradicting scores, which can confuse HubSpot's automation tools.
For step-by-step scoring setup, check out this helpful guide on building lead scoring models.
Prospect & customer segmentation
66% of B2B buyers expect the same or better degree of personalization in their professional lives as their personal lives. Over half expect highly personalized engagements during the discovery and purchase process. Segmentation, then, is key to effective lead management.
But HubSpot's segmentation tools won't do you any good if you haven't defined your segments upfront. So before you dive in, you should first define your prospect & customer segments (and their assigned sales reps) and ensure that segmentation data makes its way into HubSpot.
Automation vs. manual action
One of HubSpot's main draws is its powerful workflow automation capabilities. Before setting up workflows in HubSpot, however, you'll need to map out your qualification, assignment, routing, and nurture processes so you can decide what to automate. (Pro tip: This is especially important if your buyers often engage in non-linear customer journeys.)
Additionally, you should decide which activities you should automate, and which ones you should let a human being handle. For example, lead routing and qualification should probably be automated, while sales outreach is something that works best one-to-one.
Thankfully, HubSpot allows you to incorporate both automated actions and manual tasks and reminders into the same workflow.
Data quality and hygiene
Even the most sophisticated automation platform is only as good as the data it holds. HubSpot will only work when you fill it with accurate, up-to-date, and governed data. Bad data, on the other hand, can lead to misrouted leads, irrelevant messaging, and duplicate records.
HubSpot features several data enrichment features, and also enables you to integrate third-party lead enrichment solutions.
How to build a lead management strategy
Now that we've laid out some key considerations, let's talk about some of the practical steps you can take to build a successful lead management strategy before you start implementing it in HubSpot.
Clearly define your goals and objectives
As mentioned earlier, a lack of clear goals is one of the main reasons why lead management implementations fail. So the first step in building your strategy is deciding what you want to accomplish in the first place. Some examples of lead management goals include:
- Increase the amount of leads generated
- Improve lead-to-customer conversion rates
- Increase annual contract value (ACV) or customer lifetime value (LTV)
- Boost lead quality (i.e. a combination of speed-to-lead, conversion rates, sales cycle length, and revenue from leads)
Outline buyer journeys
Once you've identified your lead management goals, the next step is to outline your buyer journeys. Typically, it's helpful to have some kind of a visual framework showing each stage:
- Capture. Leads visit your site and request more information through web forms, social media, or product sign-up pages.
- Enrichment. Build a complete picture of the lead and account.
- Qualification. Quickly determine which leads are worth prioritizing to focus on high-value opportunities.
- Routing. Qualified leads should be automatically sent to the best salesperson based on enrichment data like industry experience or product expertise.
- Scheduling. Once routed, schedule a meeting ASAP. Our proprietary data shows that integrating scheduling with forms increases response time by 240X.
- First Meeting/Discovery. The discovery call confirms whether the lead is a good fit and ready to buy, while uncovering key details that can help in crafting a tailored proposal.
- Follow-up/Nurture. After the first meeting, keep prospects engaged with automated follow-ups to ensure they move to the next step.
- Second Meeting/Proposal. Some deals close after one follow-up; others need more time.
- Contract. Even after a verbal yes, deals can fall through. It's important to actively manage the deal until the contract is signed.
- Onboarding. A smooth onboarding process ensures clients see results from your product quickly, reducing the likelihood of churn.
For each phase, it’s important to map customer intent and the type of content or engagement that will resonate with that intent. For example, during the awareness stage, potential buyers may prefer educational blogs or videos, while in the decision phase, they may respond better to testimonials or detailed product comparisons.
Figure out HubSpot’s place in your strategy
Next, start thinking about how to best integrate HubSpot with your strategy. Are there specific pain points or gaps in your current lead management that HubSpot can fill? How can its features help streamline and improve your existing processes?
Here are some specific areas where HubSpot can accelerate the lead management process:
- Centralized database. HubSpot stores all contact info in one place, making it easy to access lead history, company details, and interaction timelines.
- Lead scoring. Customize lead scoring to automatically prioritize leads based on engagement and fit.
- Segmentation and nurturing. Segment leads and create targeted nurturing campaigns with ease.
- Lead tracking and analytics. Track lead activities and interactions with detailed reports and dashboards.
- Automated follow-ups. Use automated workflows, email scheduling, and task management for timely follow-ups.
- A/B testing. Test and optimize landing pages with built-in A/B testing tools.
- Multi-channel lead generation. Generate leads via forms, chatbots, meeting links, and ads integration.
Augment HubSpot's capabilities
For all its advantages, HubSpot has several drawbacks:
- Limited flexibility. HubSpot's workflows and automations are great for simple, straightforward processes. But for more complex, non-linear customer journeys, it can be quite rigid
- Limited notifications. When an inbound lead comes into your business, time is of the essence. Wait five minutes, and the chances of converting that lead into a meeting plummet. Unfortunately, HubSpot's notification features aren't the most reliable.
- Expensive lead enrichment. HubSpot's new Breeze Intelligence enrichment feature operates on a credit-based pricing model, adding an extra layer of cost to an already pricey platform.
- Integration challenges. HubSpot integrates with a wide range of software, but does nothing to orchestrate them to work with each other. This presents significant risk, as one broken integration can cause errors, data loss, and revenue leakage across the system.
Because of these limitations, it's important to consider other solutions to augment HubSpot's capabilities. This may include using additional software for automation, lead enrichment, or integrating with other tools to create a more comprehensive lead management system.
Check out our comprehensive HubSpot vs. Default comparison to learn more about HubSpot’s limitations and how Default solves them.
Keep evaluating and adjusting your strategy
Lastly, it's crucial to regularly evaluate and adjust your lead management strategy over time. As your business grows and changes, so will your target audience and their needs. Continuously analyzing data and metrics from HubSpot (and other tools) can help you identify areas of improvement and make necessary adjustments in real-time.
Remember, building a successful lead management strategy is an ongoing process, not a one-time task. Just because something worked last quarter doesn’t mean it will work in the next. Keep experimenting, learning, and adapting to stay ahead of the market—and your competition.
Lead management implementation in HubSpot: Step-by-step guide
Once you have your strategy in place and a clear idea of where HubSpot fits into the mix, it's time to implement your lead management strategy in HubSpot. Here's a step-by-step guide to make that happen.
Step 1: Centralize all data in your CRM
To use HubSpot as your lead management software, all your data needs to be centralized within the system. HubSpot automatically creates records for any new inbound leads that come in. But if you have existing data, you'll need to import it into the system.
NOTE: Before you import data into HubSpot, you'll need Import and Edit permissions enabled for the object record you're importing. Contact your HubSpot admin to verify these permissions before proceeding.
To import data into HubSpot:
- Select Import at the top right of any object index page OR navigate to Settings > Import & Export > Go to import
- Once you've reached the Imports page, select Import a file, then Start Import.
- From there, select which objects or activities are in your import file. Then, select Next. (Note: you can import multiple objects at a time.)
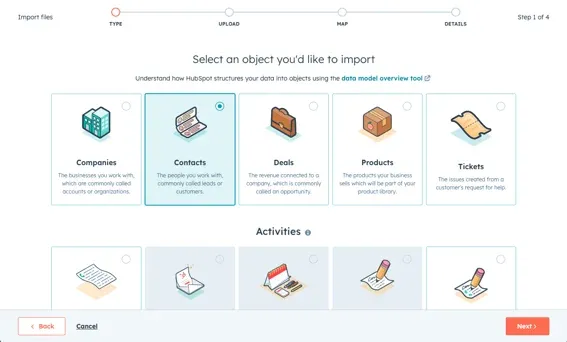
- Choose how to import [objects/activities]. You have three options:
- Create and update: Creates new entries and updates existing ones if a unique identifier is included. (NOTE: Updating records requires you to map the correct unique identifier: Record ID, email, or company domain name)
- Create only: Adds new entries; existing ones are ignored.
- Update only: Updates existing entries using a unique identifier; new entries are ignored.
- Map your CSV columns to HubSpot properties. When importing files, HubSpot automatically matches your file's columns to object or activity properties based on headers and property names. If you're importing two files, each gets its own mapping page.

- Select Next, then finish your import.
You can also integrate other tools from your RevOps tech stack to seamlessly transfer contact data directly into HubSpot. This process varies by which specific integration you use.
Step 2: Configure lead status settings
After all your data is centralized in your HubSpot CRM, the next step is to configure your lead status settings to align with your own sales process.
Lead status is a HubSpot property that enables you to track the current stage of each lead through the funnel. Individual contacts can be assigned a lead status in a number of ways:
- Manually update the lead status property for your contact
- Import to update the lead status property for a list of contacts (see steps above)
- Use "Set a property value" action in a workflow (Professional and Enterprise only)
- Use a form hidden field (Professional and Enterprise only)
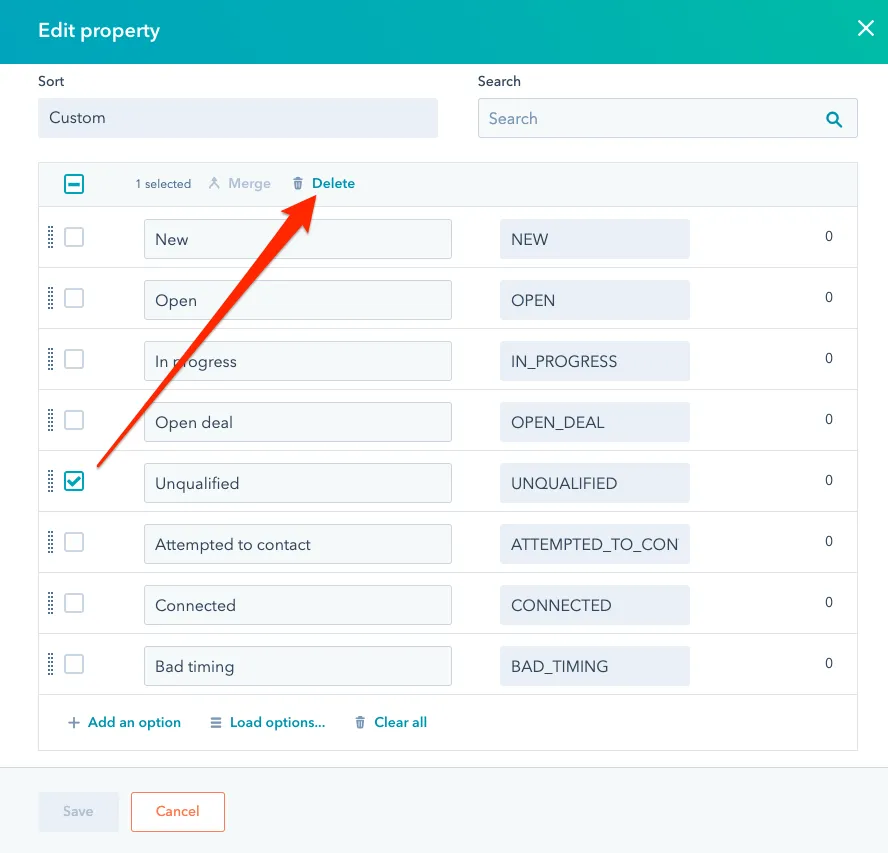
Here’s how to configure Lead Status in HubSpot:
- In your HubSpot account, click the settings icon in the main navigation bar.
- In the left sidebar menu, navigate to Contacts & Companies > Leads.
- To the right of Lead Status, select Edit.
- In the dialog box, update lead status options and their properties as desired.
- Select Save.
Step 3: Set up lead scoring in HubSpot
Before you start setting up HubSpot automations, you need to score your leads. Lead scoring is important not only to surface qualified, ready-to-buy leads, but also to managing those leads after they're qualified.
Lead scoring can be used in a number of lead management processes, including:
- Prioritizing outreach efforts by identifying high-scoring leads most likely to convert
- Segmentation of leads for personalized communication strategies
- Triggering automated workflows to nurture leads based on their score
HubSpot offers two approaches to lead scoring: manual and predictive. Manual lead scoring in HubSpot assigns and detracts points based on certain property values. Predictive lead scoring uses machine learning to predict a lead’s likelihood to close within 90 days and prioritize contacts based on that value.
Here’s a link to a recent article where we did a deep dive on HubSpot’s built-in lead scoring capabilities.
Step 4: Set up custom workflows in HubSpot (with examples)
Once you've configured your lead status and scoring, the next step to implement your lead management strategy in HubSpot is to start building automation workflows. Let's start by walking through how to create a Workflow in the first place, then go through some examples to illustrate what's possible with this powerful automation tool.
Note: Workflows are only available for Marketing or Sales Hub Professional users.
How to create a Workflow in HubSpot
- Navigate to the Workflows tool by hovering over the Automations icon on the side menu, then selecting Workflows from the pop-up menu.
- Select Create Workflow.
- Choose either From scratch or From template.
- If you're creating a Workflow from scratch, choose Contacts as the Workflow object. You can then choose either a Blank workflow (default option) or pick a more specific workflow type like Specific date, Schedule, or Contact date property.
- If you're creating a Workflow from a template, filter through HubSpots Template Library by your use case or keywords (e.g. lead assignment, lead routing, scheduling). Once you've found a template you're interested in, select Review to make sure it meets your needs. If you like what you see, select Use template.
- Customize your Workflows by adding Branches, Communications, Tasks, CRM actions, and more.
Lead assignment workflow
Workflow objective: Assign leads to the best sales rep either through round robin or rules-based routing.
Here's how to build a lead distribution workflow in HubSpot:
- Navigate to the Workflows tool as outlined above.
- Select Create Workflow > From scratch. Select Contacts as the Workflow object.
- Select Set enrollment triggers. For lead assignment workflows, a common trigger is setting property-based (e.g. “Lead Status is equal to ‘New’”) or activity-based criteria (e.g. specific form submissions).
- After setting up your trigger, click the + icon to add an action. From the options that appear, select Rotate contact to owner under the CRM actions menu. This allows you to evenly distribute leads among your sales team based on your pre-configured settings.
- Alternatively, you can route leads based on specific property values (e.g. Industry, Company Size, Job Title). To do this, create a Branch, where the condition for that branch is the desired property.
- Add any other follow-up actions, like an internal notification email, Slack notification, or enrolling the lead in a sales sequence.
- Review & publish your workflow.
Form submission follow-up
Workflow objective: Send an immediate message to a newly converted lead to request a demo, share helpful information, or start building a relationship with a sales rep.
- Navigate to the Workflows tool by following the steps outlined above.
- Select Create Workflow > From scratch. Select Contacts as the Workflow object.
- Set a Form submission as your enrollment trigger. You can either enroll a contact when they submit any form, or specific form(s).
- Add an action: Send email.
- Choose an email template from your HubSpot email library or create a new one tailored to your audience. Personalize the email with tokens like the lead’s first name or company name to make it feel more relevant and engaging.
- If needed, add a delay between the initial form submission and the email-sending action by selecting Delay from the actions list.
- Add any other follow-up actions, like an internal notification email, Slack notification, or enrolling the lead in a sales sequence.
- Review & publish your workflow.
Lead status progression workflow
Workflow objective: Automatically update lead status based on engagement logged in HubSpot.
- Navigate to the Workflows tool by following the steps outlined above.
- Select Create Workflow > From scratch. Select Contacts as the Workflow object.
- Set your enrollment triggers. Some good options include “last activity date is known” or “email reply is received.”
- Add an action: Set property value. Update the Contact property “Lead status” to the desired value.
- Add additional actions, including conditional branches, as desired.
- Review & publish your workflow.
Lead scoring workflow
Workflow objective: Route higher scoring leads to sales and lower scoring leads to a marketing nurture.
- Navigate to the Workflows tool by following the steps outlined above.
- Select Create Workflow > From scratch. Select Contacts as the Workflow object.
- Set your enrollment trigger as a Form submission (either all or specific forms).
- Add an action: Branch. The condition for that branch should either be HubSpot score (manual lead scoring) or Likelihood to close (predictive lead scoring).
- For contacts “Greater than or equal to” your desired threshold, add an action: Rotate record to owner. This will distribute leads through round robin rules. Alternatively, you can create additional branches to route based on custom properties.
- For contacts less than your desired threshold, either add a series of Delays and Send email actions, or, if your marketing sequence already exists in another workflow, add an Add to another workflow action.
- Review & publish your workflow.
Drawbacks of Hubspot lead management
Despite its many benefits, HubSpot lead management has some drawbacks to consider. These include:
- Data management challenges. Some users struggle with managing HubSpot duplicates and lead-to-account matching.
- Single owner limitation. Contacts only have one owner, which can be challenging when multiple reps are targeting the same account (e.g. an SDR and AE team).
- Complex list criteria limitations. There are restrictions on how complex the criteria for active lists can be, potentially limiting advanced segmentation capabilities.
- Confusing module packages and additional costs. HubSpot's modular structure can lead to confusion and unanticipated expenses, especially for advanced features.
- Limited customization. While HubSpot offers a wide range of tools and features, some users may find that certain aspects cannot be customized to fit their specific needs.
- Reliance on integrations. To get the most out of HubSpot's lead management capabilities, you may need to integrate it with other software and tools, which can increase the risk of lost or corrupted data.
HubSpot lead management FAQs
How do you manage leads in HubSpot?
There are a range of tools you can use to manage leads in HubSpot, including manual and predictive lead scoring, automation workflows, a centralized CRM, and more.
How do you manage lead status in HubSpot?
HubSpot provides a Lead Status property to track lead progress through your sales pipeline. Lead Status options include: New, Open, In Progress, Open Deal, Unqualified, Attempted to Contact, Connected, and Bad Timing.
What is a HubSpot lead flow?
A HubSpot lead flow is a visual representation of how leads (potential customers) move through marketing and sales funnels. It’s essentially a way to track and manage the journey of a prospect from their initial interaction with your business to becoming a paying customer
Final thoughts on lead management in HubSpot
HubSpot brings a number of valuable lead management features to the table. However, for organizations who value control over their automations and want to fine-tune the lead management process—not to mention orchestrate HubSpot with a larger suite of RevOps software—it leaves much to be desired.
Default, on the other hand, enables fully customizable automations, orchestration, and data management across an organization's entire tech stack. Our platform captures, enriches, scores, routes, and schedules leads from one location and fully integrates with HubSpot.
Conclusion
Former pro Olympic athlete turned growth marketer! Previously worked at Chili Piper and co-founded my own company before joining Default two years ago.
Accelerate your growth with Default.
Revamp inbound with easier routing, actionable intent, and faster scheduling


%201.svg)


.svg)


%201.svg)


%201.svg)
